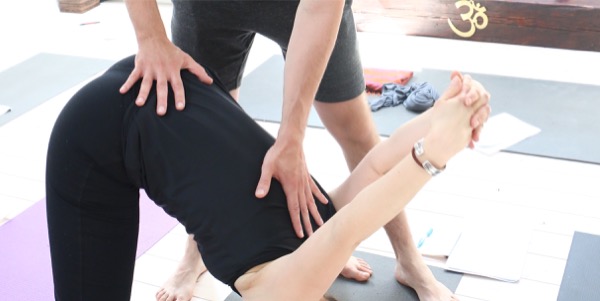
Adjustments are a big challenge for many teacher trainees. They are an excellent tool to guide a student, give clear direction and communicate intention. On the other hand, poorly executed adjustments can bring a student out of balance, lead to confusion about what to do or in the worst case cause injury to the student.
Experience of the asana and its adjustments is always key to adjusting others
A teacher needs to have a great deal of experience with practicing the asanas as well as practicing the adjustments on various body types, combined with a deep knowledge of the body mechanics of each asana, and an ability to read a student and sense her needs at a particular moment.
Depending on the yoga style being taught, adjustments are covered in many teacher training programs. But time on a teacher training is limited and I often get asked from TT-students if there is a book or DVD, that would allow students to keep practicing and studying by themselves.
Any “dead” media (such as books, blog articles, DVDs) limited in its ability to transmit knowledge as it’s not able to offer feedback. With a DVD at least you see the adjustment being performed instead of just seeing a picture with arrows pointing out where to push and pull.
I have researched adjustment books over the years, but in my opinion it’s very hard to cover such a dynamic and complex subject as the art of adjusting in a book.
That’s why I was excited to see David Keil doing a DVD on adjustments.
At the beginning of the DVD David Keil gives a short introduction into the field of adjusting, sharing do’s and do-not’s.
I strongly believe in personal experience and using adjustments to support the student in this very moment to experience the asana in a more beneficial way, without imposing what is right or perfect in terms of a particular asana. We are all biased by our own body experience, what we think an asana should be looking like or what the student should be able to be doing, or where the focus is, what we have been taught and so on. The trick lies in being aware of our bias, and using it and our experience to assess the student and then give him the best support.
That view is supported by David Keil who explains his approach and gives general guidelines such as:
- Observe the student
- Be aware of your own bias
- Create a clear intention
- Ground the student
- Feel and sense
- Adapt to the moment
- Adapt to the student
- Move into the adjustment slowly
- Create space and length
- Use good body mechanics
- Don’t over adjust or adjust poses that you don’t know
Then David Keil goes on to give a great and clear explanation on why we do adjustments
It’s the concept of unassisted range of motion, assisted range of motion and how it relates to the benefits and dangers of adjusting. As we go into stretch, we can only go so far into flexion by ourselves, the adjustment can assist us in using the full range of motion but needs to stop before we enter the injury zone. Using the full range of motion helps the practitioner to improve their practice much faster and benefit from it, than if they just practice without adjustments.
This made a lot of sense to me and I related to it from my experience of teaching a daily Mysore-Self-Practice program.
The DVD helps in assessing and assisting different body types
For giving proper adjustments for each student, it’s also important to know what to do with different body types, how to approach them, how to use the whole body for the adjustments, how to position yourself depending on what focus your adjustment has.
The DVD helps here as different body types and different focus points to adjust are presented in the Video.
Especially Teacher trainees who are still learning and want to repeat the various adjustments without access to a experienced guide might benefit from using the DVD. However, just watching it won’t do the trick. You have to practice. And here the difference between attending a live adjustment workshop and just having the DVD becomes clear. All the knowledge presented on this DVD is definitely worth the price of the DVD, but you won’t get the practice and fellow practitioners to work with.
However without a good understanding of the asanas covered on the DVD, you won’t get the full benefit
I do think you have to practice and know the asanas already quite well to really benefit from David’s great advices. Otherwise the intention of the adjustments and why you intentionally press, pull or support the student’s body in a certain way won’t be clear. So rule number one always remains valid: Do your practice!
Summary of how David Keil’s Hands-On Adjustments might help you:
- It’s a good reminder of what different approaches can be used to adjust different body types. Even if I was familiar with most of the adjustments, we tend to use much less adjustments in our classes than we might know. So it’s always good to refresh our minds and try new ways sometimes
- Sometimes students might have a particular challenge in a certain asana that we don’t immediately know how to support them. Maybe they have a completely different body type so our personal experience is not helpful. Then this DVD can be a invaluable resource, as it covers different body types and really all the standard poses used in various Yoga styles.
- The DVD is filmed like a workshop, and to learn adjustments, I agree with David, you have to do it. So it’s really best to watch the DVD with a Yogi friend or fellow teacher and do the adjustments as you watch and give each other feedback. Merely watching it will do little to improve your skills as a body worker, as it is with any “dead” medium like books, blog articles (like the one your are reading now).
That said, if you want to really work on your adjustments this DVD is the best I have seen so far, much better than reading a book about it. And compared to actually going to a workshop very decently priced. However if you just want to buy it to own yet another Yoga DVD, just wait and use this time to practice :)
All asanas covered on the DVD:
STANDING POSES:
Standing Forward Bend – padangusthasana
Upward Facing Dog Pose – urdhva mukha svanasana
Downward Facing Dog Pose – adho mukha svanasana
Sun Salutation – suryanamaskara
Extended Triangle Pose – utthita trikonasana
Extended Side Angle Pose – utthita parsvakonasana
Warrior 2 Pose -virabhadrasana 2
Half-moon Pose – ardha chandrasana
Revolved Triangle Pose – parivrtta trikonasana
Side Stretching Pose – parsvottanasana
Revolved Side Angle Pose – parivrtta parsvakonasana
Warrior 1 Pose – virabhadrasana
Warrior 3 Pose – virabhadrasana
Wide-leg Forward Bend:A and C Versions – prasarita padottanasana A and C
Extended Hand to Foot Pose – utthita hasta padangusthasana
Standing Half-bound Lotus Forward Bend – ardha baddha padmottanasana
Tree Pose – vrksasana
SEATED POSES & INVERSIONS:
Seated Forward Bend – paschimattanasana
Three Limbs Facing Forward Western Stretch – triang mukhaekapada paschimattanasana
Marichyasana A
Marichyasana C
Half-Matsyendra’s Pose – ardha Matsyendrasana
Head to Knee Pose – janu sirsasana A
Bound Angle Pose – baddha konasana
Half-Bound Lotus Seated Forward Bend – ardha baddha padma paschimattanasana
Camel Pose – ustrasana
Upward Bow Pose – urdhva dhanurasana
Shoulder Stand – salamba sarvangasana
Headstand – sirsasana
ASHTANGA POSES:
Marichyasana B
Marichyasana D
Pasasana
Kurmasana
Supta Kurmasana
Bhujapidasana
Drop-backs
Kapotasana
Karandavasana
Garba Pindasana
Purvottanasana
Krounchasana
Bhekasana
Supta Vajrasana
Bakasana
Eka pada Sirsasana
photocredit (title): sandra db